
The best place for your first custom Lodestone is at your main base if that base is a meaningful distance from the Temple starting area. If your base is already close to the Temple, place the first one outside a repeatable Dragonkin Vault instead. Building your first Lodestone activates the inactive Lodestone at the Temple, so putting another one beside the starting point usually wastes the strongest early placement opportunity.
After that, expand in this order: your main base, the exterior of a Vault you expect to revisit, a distant regional hub, and then recurring quest, gathering, or building destinations. Place each one where it removes a journey you actually repeat. Do not scatter Lodestones across nearby landmarks simply because you have spare materials: every teleport consumes Law Runes, and the cost increases with both distance and the weight you are carrying.
Best Lodestone Placement Order
A useful network grows with your routes rather than with the number of places you have discovered. This priority order covers the most valuable placements without turning every point of interest into a separate stop.
| Priority | Recommended location | What the placement solves | When to delay it |
|---|---|---|---|
| 1 | Main base | Connects storage, crafting, food, equipment, and every outward route | Delay when the base is already a short walk from the Temple Lodestone |
| 2 | Outside a repeatable Dragonkin Vault | Shortens repeated Vault Core runs and helps fund additional Lodestones | Delay until you can clear the Vault reliably |
| 3 | Distant regional hub | Removes the longest repeated walk into your current progression area | Delay if you have only visited the area once |
| 4 | Recurring resource or quest route | Cuts travel to a destination used across several sessions | Delay when the objective is nearly complete or the trip is already short |
| 5 | Major construction or farming outpost | Makes it practical to bring supplies to a long-term secondary site | Delay until the project has enough work to justify repeated travel |
This order is not a fixed requirement. It is a test of value. A Lodestone earns its place when it repeatedly connects two activities that matter, such as storage and a Vault, rather than merely marking an attractive location.
Why the First Custom Lodestone Changes the Network
The Temple starting area already contains an inactive Lodestone. It becomes active when you build your first Lodestone elsewhere. That means your first custom structure immediately creates a usable two-point network: the new location and the Temple.
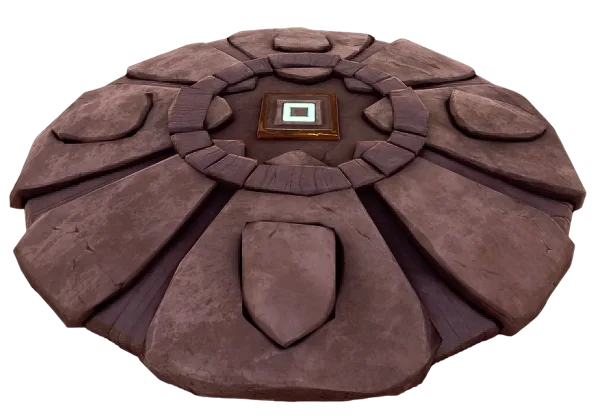
The Temple starting area has an inactive Lodestone before the first custom one is built.
Use that free anchor when choosing the first destination:
- If your main base is far enough from the Temple that routine crafting and storage trips are tedious, build at the base.
- If your starter base is close to the Temple, build outside the first Vault you plan to repeat.
- If you have already moved into another region, choose the safe arrival point that removes the largest section of the journey back to Temple Woods.
You cannot open the map and teleport from anywhere. You must physically interact with a Lodestone to travel to another one. A good network therefore connects complete routes. Arriving near a useful destination is only half of the plan; you also need a convenient Lodestone at the place from which most journeys begin.
What You Need Before Choosing a Location
Each player-built Lodestone requires the following materials:
| Material | Quantity |
|---|---|
| Stone | 32 |
| Rune Essence | 20 |
| Vault Core | 1 |
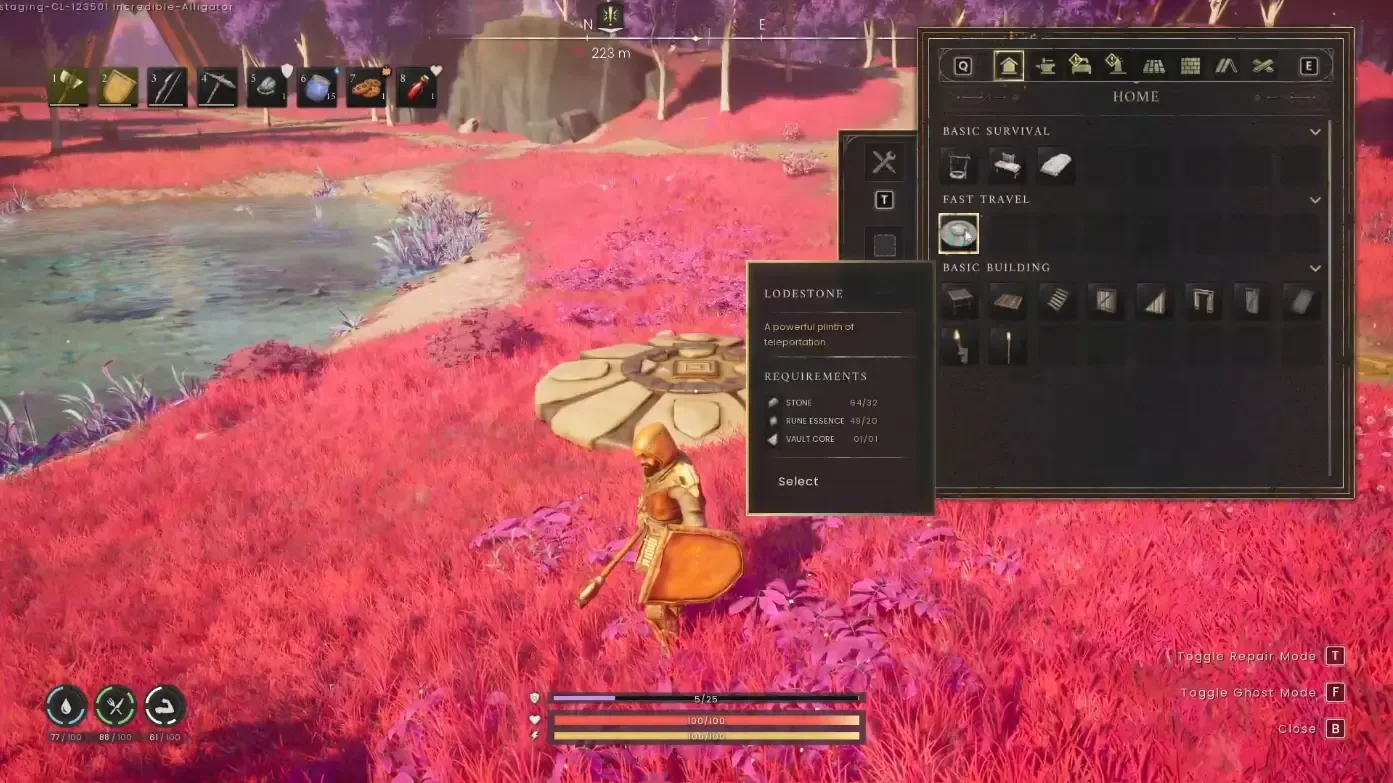
The build interface shows the three materials required for a Lodestone.
Stone and Rune Essence are the bulk materials, while the Vault Core is the limiting component that links expansion to Vault exploration. Vaults are repeatable, which is why an exterior Vault placement is so effective: the route helps you obtain cores for later nodes while also connecting that Vault to your base and the Temple.
You also need Law Runes to use the finished network. The minimum teleport cost is one Law Rune, but the displayed cost changes according to the distance between the two Lodestones and your total carried weight. A location can therefore be strategically useful without being cheap for every trip. Check the cost shown on the Lodestone map before confirming a long, heavily loaded journey.
Do not build inside the Vault itself. Lodestones cannot be placed inside Dragonkin Vaults or other instanced areas. Put the structure outside the entrance, on a legal and safe patch of ground that you can identify quickly after teleporting.
Build a Hub-and-Spoke Network
The most reliable layout is a hub-and-spoke network. Your main base acts as the hub, while Vaults, regional entrances, recurring objectives, and secondary projects become spokes. This arrangement keeps storage and preparation at the center instead of forcing you to carry every possible tool, food item, and building material between remote sites.
Use these criteria before committing a Vault Core to a new spoke:
- Count repeat trips, not first-time excitement. A spectacular location is not automatically a useful transport node. Favor the destination you have already needed to revisit.
- Measure the walk the node removes. A placement that skips one long regional approach is usually more valuable than several nodes separated by short walks.
- Consider what you carry in each direction. Law Rune cost rises with carried weight. A route used while lightly equipped may be cheap, while the return journey with a full material load may cost more.
- Choose a legal arrival area. Avoid instance boundaries, Vault interiors, and restricted parts of the map. Confirm that the build preview is accepted before planning the rest of the route around that spot.
- Leave room to interact. Put the Lodestone on clear ground rather than wedging it between walls, crafting stations, hostile patrol routes, or decorative structures.
- Use a recognizable landmark. A Lodestone should be easy to locate when you approach it on foot. This matters when the network is large and several markers serve the same region.
A dense cluster of Lodestones around one base does not improve the network. The Temple and your base already cover the starting side of the route. New nodes should extend reach, not duplicate coverage.
Recommended Placements by Activity
Main Base
Place a base Lodestone close to storage and crafting, but keep it in an open arrival area. The main advantage is not merely reaching the building faster. It is the ability to arrive, unload, repair, cook, change equipment, and depart again without adding another long walk to every task.
If the base sits beside the Temple starting area, use the active Temple Lodestone until the distance becomes inconvenient. The first custom node will provide more value at a Vault or distant progression hub. If you later establish a permanent base farther away, that new base becomes the stronger hub.
Dragonkin Vault Entrances
The exterior of a frequently cleared Vault is one of the best early placements. Vaults provide the Vault Cores needed for additional Lodestones, so this creates a useful expansion loop: travel to the entrance, clear the Vault, bring the core home, and use it to open another route.
Place the structure outside the instance boundary. Choose ground that remains easy to reach after leaving the Vault and does not put you directly beside hostile enemies. A node inside the Vault is not allowed, while one too far from the entrance gives back much of the travel time you intended to save.
Regional Progression Hubs
When quests and upgrades repeatedly send you into a distant region, place one Lodestone at a central, safe approach rather than beside the first landmark you encounter. The strongest regional node can serve several nearby objectives with short walks from a single arrival point.
Do not make a permanent placement solely because a quest visits a location once. Wait until the route proves that it supports repeated gathering, questing, combat preparation, or access to another part of the map. One versatile regional hub is more efficient than several narrowly useful markers.
Resource and Cargo Routes
A resource-route Lodestone should shorten the difficult or repetitive part of the trip. Place it near a safe exit from the gathering area rather than directly among hostile spawns. This gives you room to arrive, assess the area, and leave without immediately entering combat.
Carried weight matters here. The teleport into the area may be inexpensive because you are traveling light, while the return trip can cost more after gathering. Keep Law Runes available for the loaded journey and compare the displayed cost before leaving the base. If a resource site is close to an existing regional node, walk the remaining distance instead of spending another Vault Core on overlapping coverage.
Quest Routes and Corpse Recovery
A forward Lodestone can reduce the cost of failure on a dangerous route. Place it before the hostile section, outside any restricted or instanced area. If you die and need to retrieve equipment, the node can remove the long approach without dropping you into the middle of the same enemy group.
This is most valuable when the route will take several attempts or supports additional objectives. For a single short encounter, carrying a complete Lodestone recipe and committing a Vault Core may be unnecessary.
Long Building Projects
Large construction projects create repeated material-hauling trips even when the location has little quest value. A Lodestone beside a small staging area can connect stored building supplies to the work site. Keep it close enough to the project to reduce hauling, but far enough from foundations and walls that later expansion will not crowd the interaction area.
This placement becomes worthwhile when the site is a sustained project rather than a brief outpost. It is also a useful place to keep food, water, and construction materials while you work.
Reduce Law Rune Costs Through Better Placement
Teleport cost is based on the distance to the destination and the total weight you carry. Distance is fixed once the nodes are built, but carried weight changes from trip to trip. The map shows the cost before you travel, so use that number instead of assuming every journey between the same two regions costs the same amount.
Several habits make the network more economical:
- Unload unrelated materials before a long teleport.
- Prepare tools, food, and equipment at the hub instead of carrying excess supplies on every route.
- Use one central regional node when nearby objectives are reachable by short walks.
- Reserve direct long-distance links for routes that save substantial time.
- Check the return cost before filling the rest of your carrying capacity.
- Keep Law Runes at the places from which you regularly begin a journey.
The goal is not always the smallest possible rune charge. A longer jump can still be worthwhile when it removes a dangerous or repetitive cross-map journey. The important comparison is the Law Rune cost against the time and risk that the placement removes.
Placement Restrictions That Change the Answer
Lodestones cannot be built in instanced areas, inside Dragonkin Vaults, or in certain restricted parts of Ashenfall. A recommended point of interest may therefore need an exterior approach node rather than a structure at the exact destination.
Downdun Reach has especially important restrictions. Most of the region prevents Lodestone construction. The supported build areas are:
- The Approach
- The Pastures
- The Menagerie
- The Courtyard
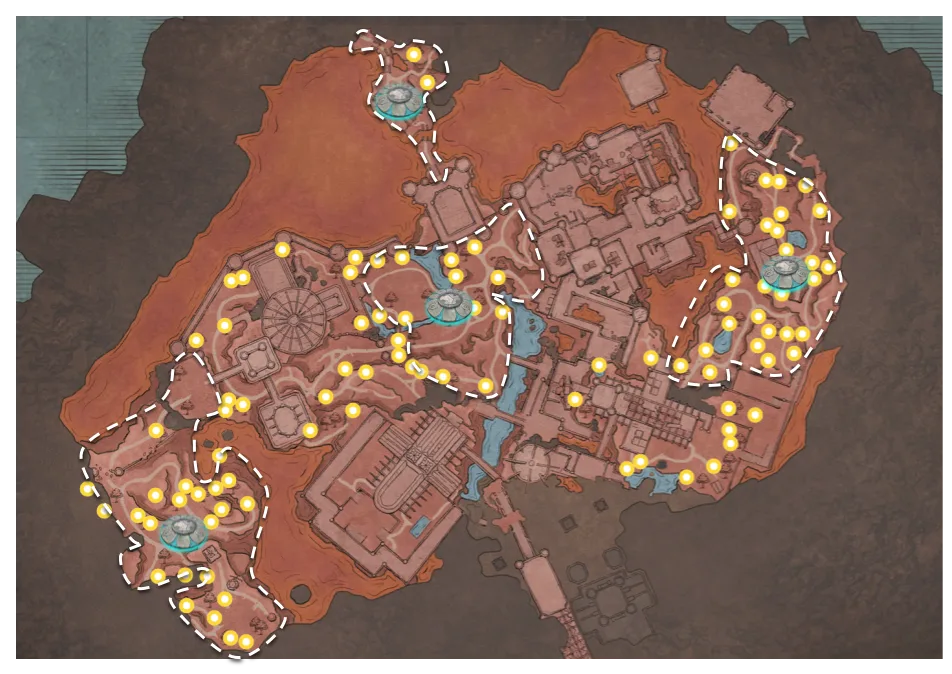
Highlighted areas indicate where Lodestones can be built in Downdun Reach.
For a Downdun Reach route, choose the allowed area that best connects the content you repeat. Do not plan a network around an apparently convenient forbidden room or corridor. The Courtyard offers broad placement space, while the other allowed areas may be better when they shorten a particular approach.
When the build preview refuses a location, treat that as a placement restriction first. Move toward an exterior or explicitly allowed area instead of assuming the recipe or materials are wrong.
Common Placement Mistakes
Duplicating the Temple Node
Building the first custom Lodestone beside the starting Temple creates two nearby anchors and leaves distant travel unchanged. Use the Temple Lodestone as the starting-area endpoint after it activates.
Building at Every Discovered Landmark
Discovery alone does not make a location useful. Nodes are strongest at repeated destinations, and every additional structure consumes a Vault Core. Wait until a route has a clear purpose.
Ignoring Carried Weight
A route that appears affordable while lightly equipped may cost more when you return with a heavy inventory. Resource placements should account for the loaded direction, not just the trip outward.
Placing Too Close to Danger
A Lodestone beside hostile patrols can turn every arrival into an immediate fight. Move the structure to a nearby safe approach when possible. The small remaining walk is worth the consistent arrival space.
Trying to Build Inside a Vault or Instance
Vaults are excellent destinations but invalid construction interiors. Place the Lodestone outside the entrance and test the build preview before relying on the route.
Expecting Teleportation From Anywhere
Dragonwilds Lodestones require you to interact with one node to reach another. They are not remote map teleports. Your network must include a convenient departure point as well as a useful destination.
Practical Network Examples
For a new character whose base remains near the Temple, a compact early network is:
- Use the Temple as the starting-area anchor.
- Put the first custom Lodestone outside the repeatable Vault you use for Vault Cores.
- Put the next Lodestone at a distant permanent base or regional hub.
- Add another node only after a repeated route proves its value.
For an established character with a remote main base, use this pattern:
- Main-base hub near storage and preparation stations.
- Vault exterior for continued access to additional cores.
- One safe hub in the region currently driving progression.
- Specialized nodes for sustained gathering, dangerous repeated routes, or major construction projects.
- A legal Downdun Reach node if that region is part of the regular route.
Both examples follow the same principle: connect high-frequency activities first, then extend the network toward the longest repeated journeys.
Final Placement Checklist
Before spending the materials, confirm all of the following:
- The destination will be visited more than once.
- It removes a substantial walk or a dangerous approach.
- An existing Lodestone does not already cover the area.
- The site is outside Vaults and other instances.
- The site is legal within region-specific restrictions.
- The arrival area is clear enough to interact safely.
- The route connects to a useful departure node such as your main base or the Temple.
- You have Law Runes available for the expected distance and carried weight.
- A central hub cannot serve the same nearby objectives more efficiently.
If those conditions are met, the placement is doing real work. Start with the base-or-Vault decision, use the Temple as the free starting anchor, and let repeated routes determine every Lodestone that follows.