
To complete Highlighting the Problem in RuneScape: Dragonwilds, first obtain the password Pthentorok from the elevated blue statue inside Thishepen Karavault. Take that password to the wizard statue outside the Runecrafting Guild, receive the mysterious orb, and use Windstep to activate one pedestal on each of the three surrounding towers. Once all three pedestals have been used, the orb becomes charged. Return it to the guild statue to finish the quest and unlock the Staff of Light recipe.
The important limitation is that you cannot begin the tower sequence without the password and uncharged orb. You need to complete First Steps, have Windstep available, and follow the route through the vault before the guild statue will advance the quest. You do not, however, need to clear the entire karavault just to retrieve the password.
Highlighting the Problem quick route
| Stage | Destination | Required action | Result |
|---|---|---|---|
| 1 | Thishepen Karavault near the Runecrafting Guild | Enter the vault and reach the elevated blue statue in the room with four giant rats | Learn the password Pthentorok |
| 2 | Wizard statue outside the Runecrafting Guild | Select Pthentorok when the statue asks for the password | Receive the mysterious orb in its uncharged state |
| 3 | First surrounding tower | Use a box or barrel as a starting point, then Windstep to the top and interact with the pedestal | First pedestal activated |
| 4 | Second and third towers | Use the mound, rooftop, and chest balcony as successive Windstep staging points | Remaining pedestals activated and the orb charged |
| 5 | Wizard statue at the guild | Return with the charged orb and interact with the statue | Quest completed and Staff of Light recipe unlocked |
Do not treat the three towers as separate exploration objectives. They form one continuous traversal route around the central guild structure. The scenery at ground level provides the extra height needed to start each Windstep jump.
Prepare before entering the karavault
First Steps is the stated quest requirement, and Windstep is essential for both the password route and the tower puzzle. There are no required inventory items for Highlighting the Problem, but that does not mean the route is free of danger. The supplied quest information recommends good armour, a suitable weapon, and food.
You will encounter a fire-arrow trap shortly after entering Thishepen Karavault, enemies farther inside, and four giant rats in the room containing the route to the password statue. Goblins are also present around the Runecrafting Guild. Equip and resupply before leaving your base so a routine fight or trap does not interrupt the traversal.
Use this preparation checklist:
- Complete First Steps and confirm that you can cast Windstep.
- Equip armour and a weapon appropriate for fighting several goblins and rats.
- Carry food rather than relying on a clean, combat-free route.
- Leave enough freedom to move through traps, ramps, rubble, and elevated openings.
- Remember the exact password spelling: Pthentorok.
The quest does not require you to bring the materials for the Staff of Light. Those materials are only needed later if you decide to craft the weapon after unlocking its recipe.
Get the password from Thishepen Karavault
Thishepen Karavault sits at the base of the cliff near the Runecrafting Guild in Bramblemead Valley. If you approach from Bramblemead Village, the supplied route places the vault northwest of the village and near the pink lake-like area. Take the lower-road detour and use Windstep to cross to the entrance side.
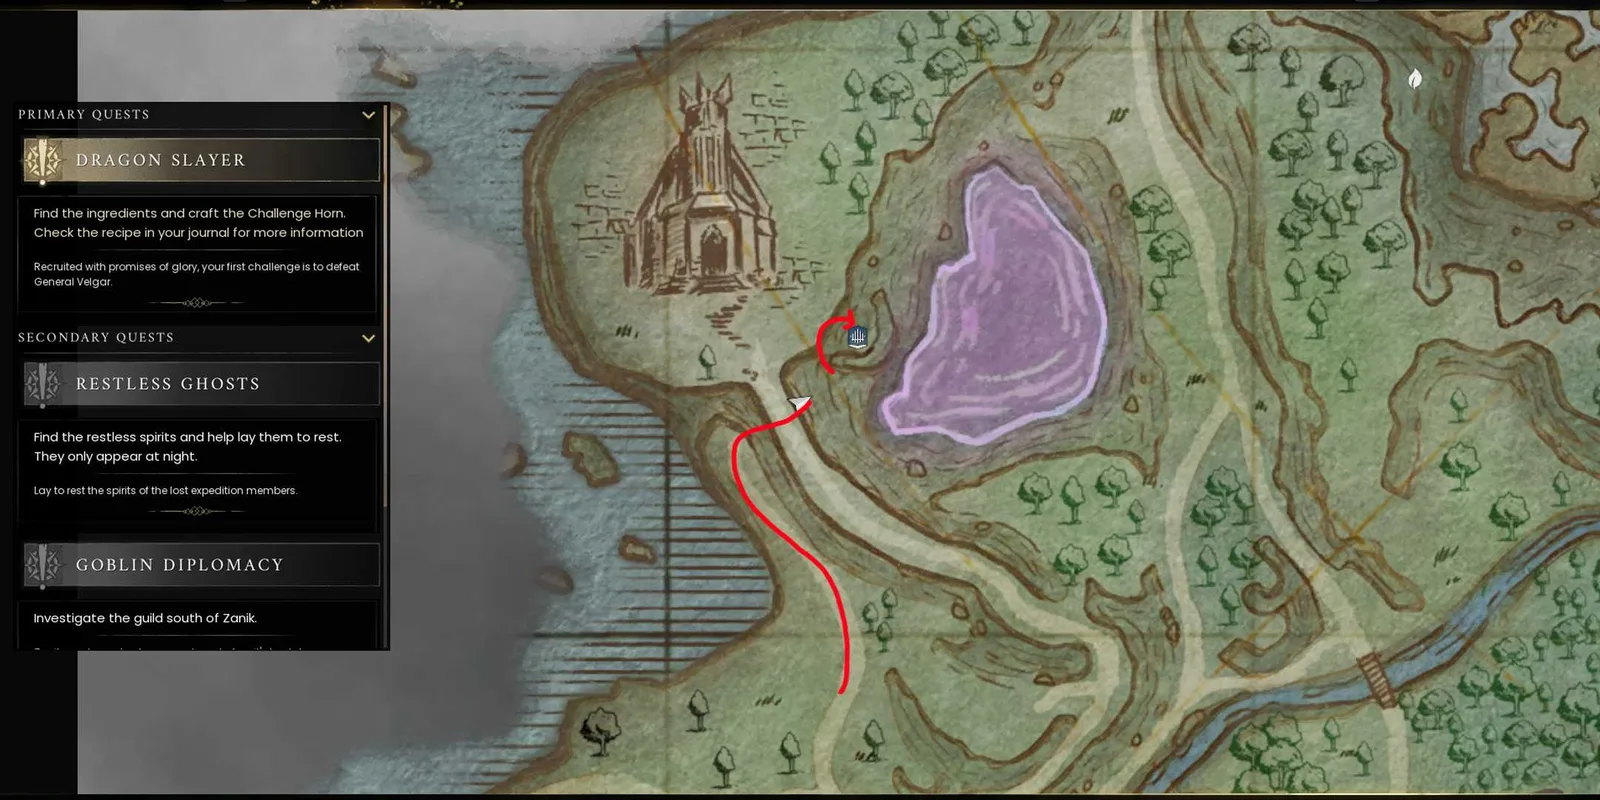
Follow the marked route around the purple lake to reach the vault entrance.
Once inside, follow this route to the password rather than trying to complete every part of the vault:
- Pass the entrance trap. A fire-arrow trap greets you almost immediately. Roll through it safely, then turn right.
- Continue through the next room. Deal with the enemies and cross the additional traps in your path. Keep moving forward through the vault.
- Use the first Vault Core as a landmark. When the first Vault Core comes into view, turn left. The core helps identify the correct junction; your immediate objective is the side route leading toward the password.
- Enter the open rat room. The correct route brings you into a larger room occupied by four giant rats. Defeat them so you can line up Windstep without being interrupted.
- Look above the normal floor route. Find the ramp, then look for the elevated opening near it. The password is not at ground level, which is why it is easy to walk past this room without finding the solution.
- Use Windstep to reach the opening. Move up to the elevated path on the right side of the room.
- Interact with the glowing blue statue. The statue supplies the name Pthentorok, which is the password needed at the Runecrafting Guild.
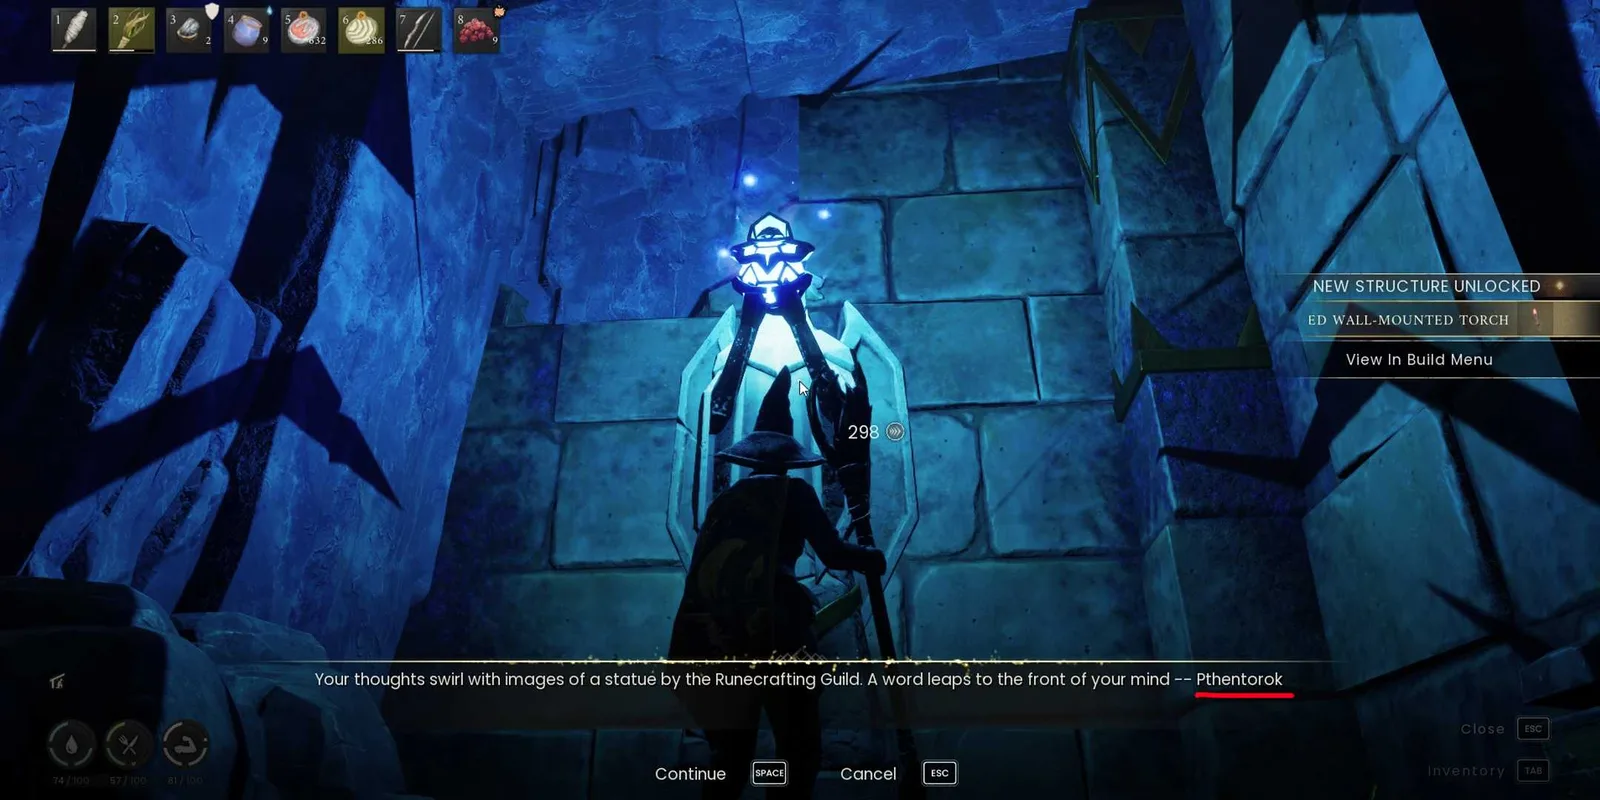
The vault statue reveals the password Pthentorok.
You can leave once you have the password. Completing the whole karavault is not a condition for advancing Highlighting the Problem. If the vault begins pulling you deeper into unrelated rooms, return to the first Vault Core landmark and recheck the left-hand route into the rat room.
Give the password at the Runecrafting Guild
Travel west from the Bramblemead Valley vault to reach the Runecrafting Guild. Goblins occupy the area, so clear any enemies that prevent you from safely examining the exterior. Look for the prominent wizard statue outside the guild rather than searching for a conventional quest-giver inside a building.
Interact with the statue and select Pthentorok from the available responses. Similar-looking joke answers may appear, but Pthentorok is the name taken from the blue statue in Thishepen Karavault. Entering the correct password causes a mysterious voice to speak and gives you the mysterious orb (uncharged).
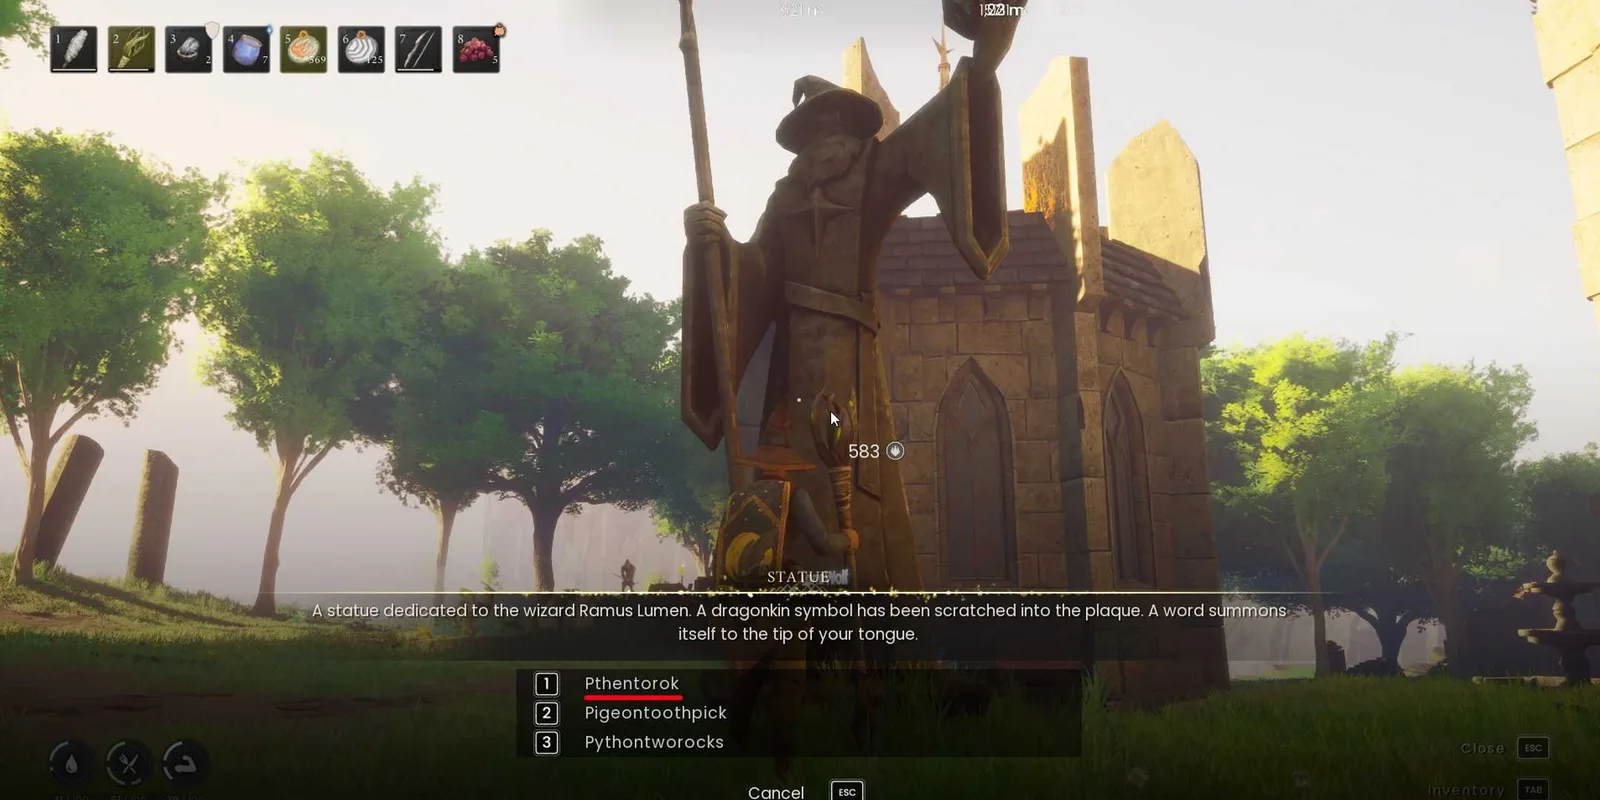
Choose Pthentorok from the three dialogue options.
Keep the guild statue in mind after receiving the orb. It is both the place where you enter the password and the place to which you must return after charging the orb. Do not leave the wider guild area in search of a distant charging site: all three required pedestals are on towers surrounding the main guild tower.
Charge the mysterious orb at all three towers
The charging objective requires three separate pedestal interactions. Each pedestal is positioned on top of a surrounding tower, and Windstep connects a route made from nearby objects, rubble, rooftops, a balcony, and the towers themselves. If a jump seems impossible from flat ground, search immediately around the base for the intended elevated starting point.
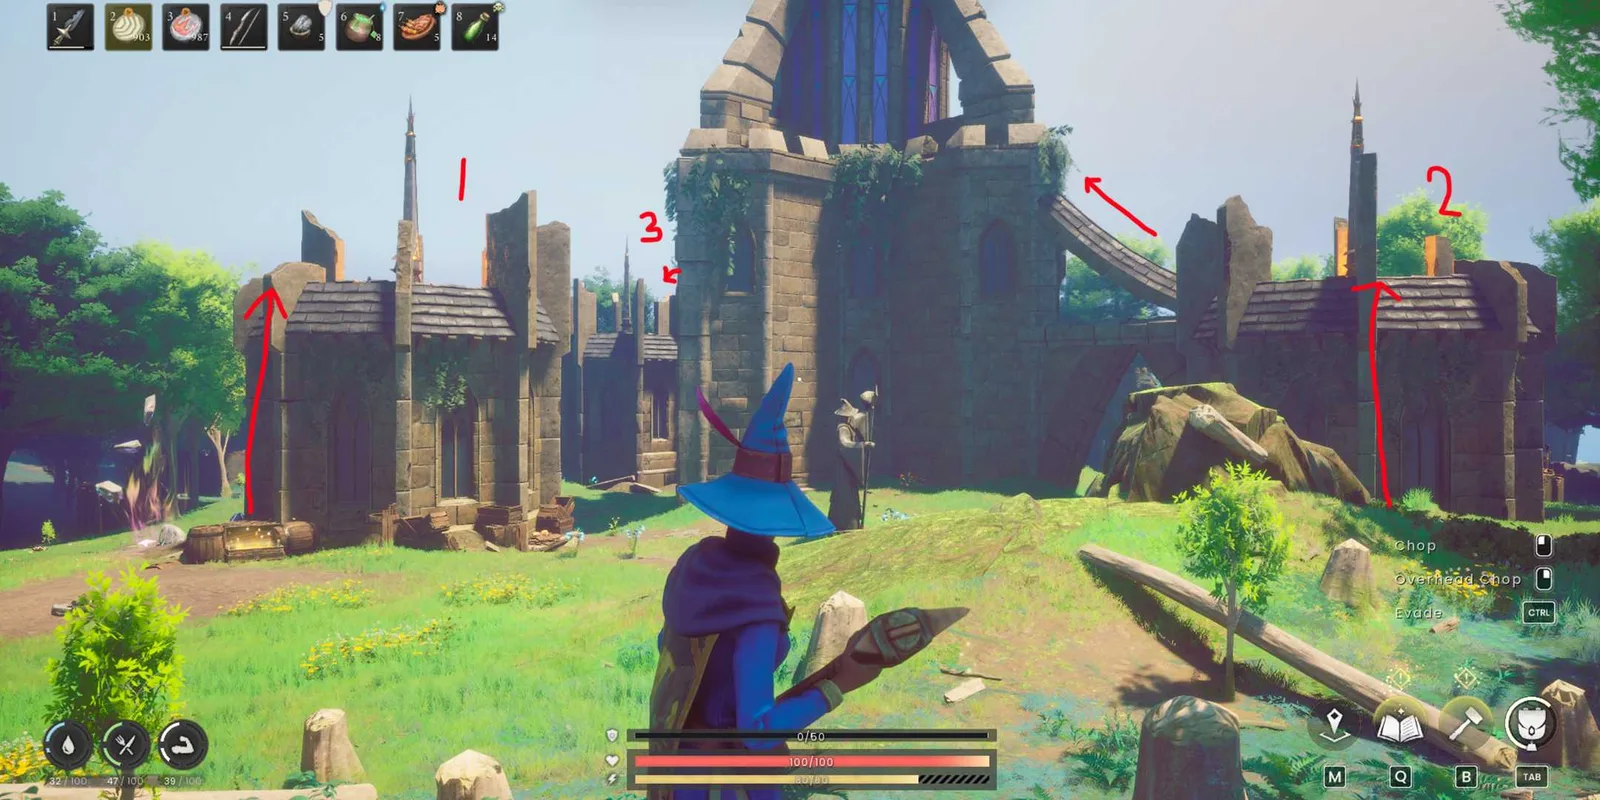
The numbered route shows the order for reaching the three tower interactions.
Activate the first pedestal
Start near the first tower and find a box or barrel beside it. Climb onto that object to gain enough initial height. From there, hold the jump input to use Windstep and rise to the top of the tower. Interact with the pedestal above to register the first charge.
Do not simply touch down on the tower and leave. The pedestal interaction is the action that advances the orb; reaching the roof by itself does not count. After using the pedestal, return to ground level and orient yourself toward the small mound near the second tower.
Reach the second tower route
Approach the mound beside the second tower and use it as the next Windstep launch point. The extra elevation is part of the intended route. Windstep upward, then continue across the rooftop rather than dropping immediately back to the courtyard.
From that rooftop, use Windstep again to reach a balcony with a chest. The balcony is an important midpoint because it sets up the crossing toward the final tower. While moving through this part of the route, interact with the available orb pedestal before continuing. If the objective later remains incomplete, revisit this rooftop section and confirm that the pedestal interaction registered.
Cross from the balcony to the third tower
Stand on the balcony with the chest and line up the final crossing. Use Windstep from the balcony to reach the third tower, then interact with the last orb pedestal. Activating the third pedestal changes the quest item from mysterious orb (uncharged) to mysterious orb (charged).
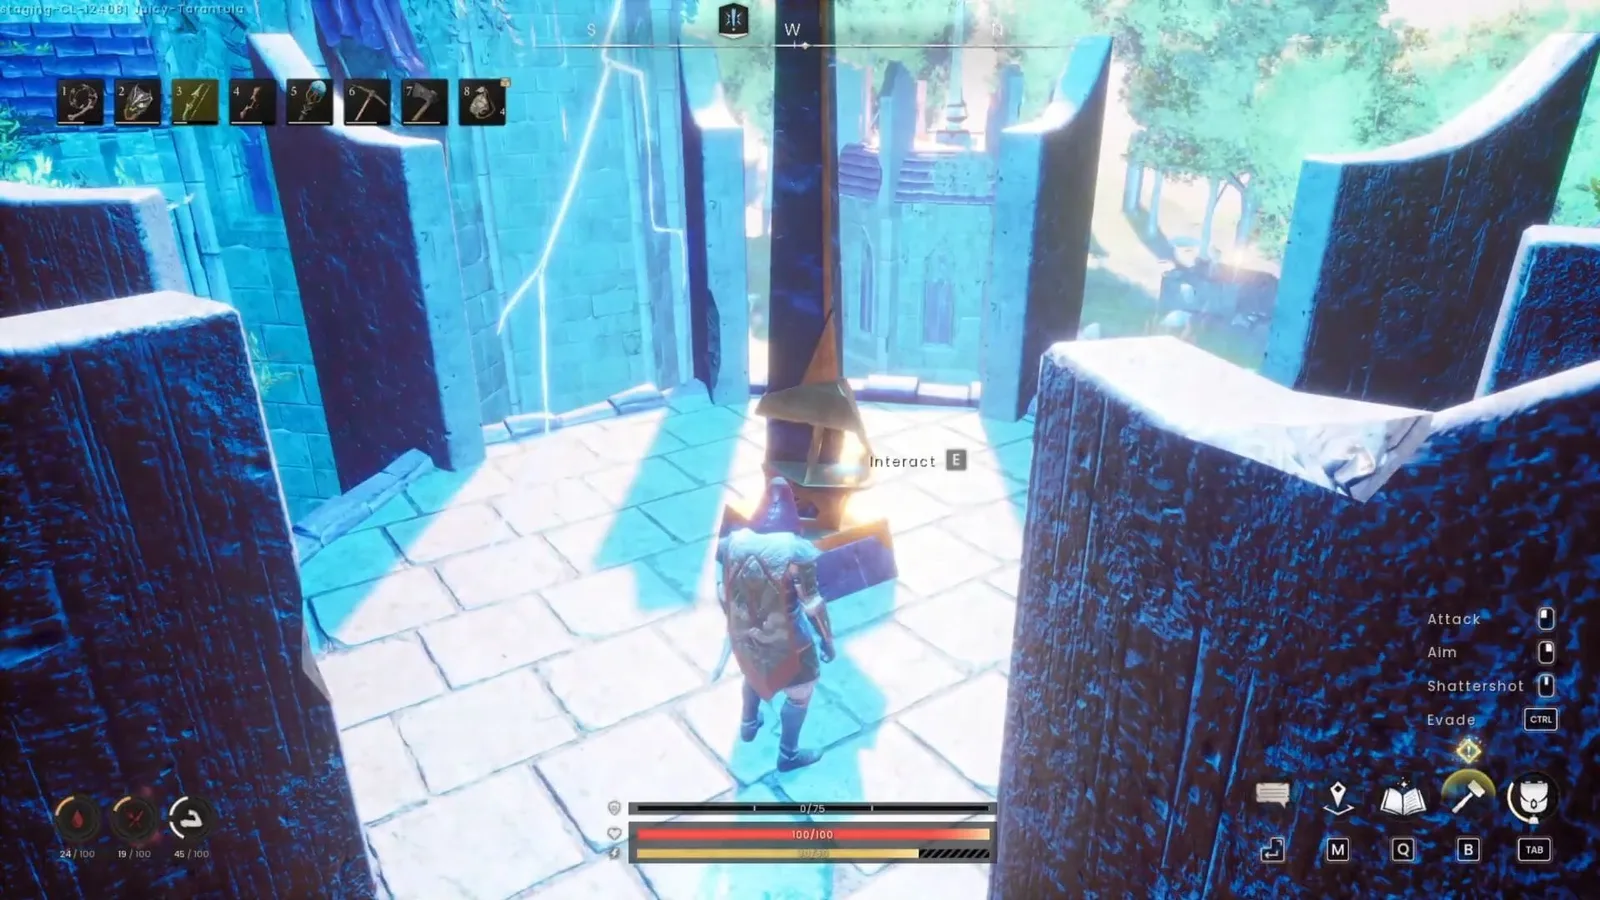
The final pedestal is reached across the tower rooftops and is marked for interaction.
Check the orb state before leaving the towers. If it still appears uncharged, one of the three pedestal interactions was missed even if you successfully landed on every roof. Retrace the same route and interact with each pedestal rather than attempting to find a fourth tower or a separate charging device.
Return with the charged orb and finish
Once the orb is charged, descend from the towers and return to the original wizard statue outside the Runecrafting Guild. Interact with it again while carrying the charged orb. The statue accepts the completed objective and grants the Staff of Light recipe, finishing Highlighting the Problem.
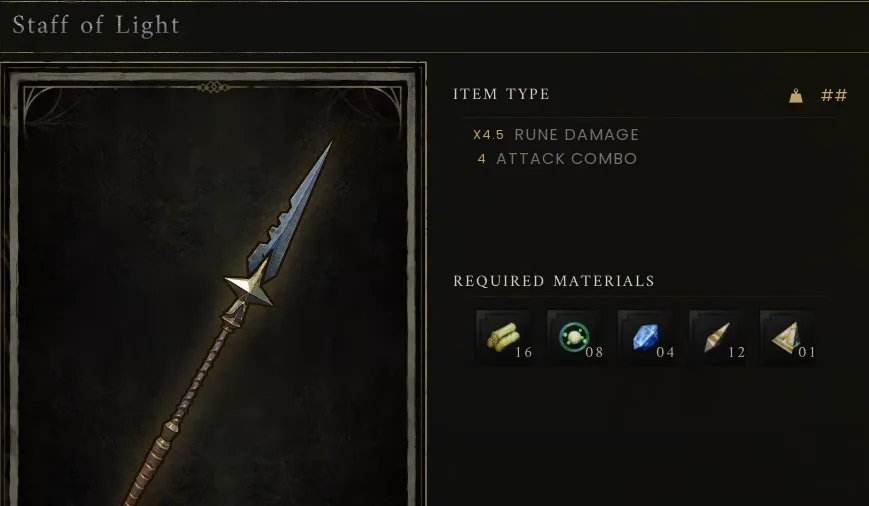
The Staff of Light recipe is unlocked after completing the quest.
Charging the orb is not the final quest interaction. If the quest remains active after the third tower, the missing step is normally the return to the guild statue. You do not need to revisit the blue statue in Thishepen Karavault after learning the password.
Fix common Highlighting the Problem blockers
The guild statue will not advance
Retrieve the password from the elevated blue statue in Thishepen Karavault first. The correct response at the guild statue is Pthentorok. Do not substitute one of the similar joke options. If you have not visited the rat room’s elevated path, return to the vault and collect the password before attempting the guild interaction again.
The password statue is missing inside the vault
Make sure you are in the open room containing four giant rats. Defeat the rats, locate the ramp, and look upward for an opening on the right-hand elevated path. The blue statue is above the ordinary floor route and requires Windstep to reach. Continuing straight through unrelated vault rooms will not reveal it.
Windstep does not seem to reach a tower
Use the scenery as a launch platform. The first tower begins from a box or barrel. The next route begins from the small mound and continues over the rooftop to the balcony with a chest. The final crossing begins from that balcony. Trying to jump from flat ground removes the height supplied by those staging points.
The orb remains uncharged
All three pedestals must be interacted with. Landing on a tower, walking past a pillar, or reaching the balcony does not replace the interaction. Revisit the first tower pedestal, the pedestal on the second part of the route, and the final pedestal reached from the chest balcony. The item changes to its charged state only after the complete set has registered.
The third pedestal did not complete the quest
The final pedestal charges the orb; it does not finish Highlighting the Problem by itself. Return to the wizard statue outside the Runecrafting Guild and interact with it while the orb is charged. That return interaction awards the recipe and completes the quest.
Enemies keep interrupting the route
The quest information identifies multiple goblins as enemies and also places four giant rats in the password room. Clear nearby enemies before attempting precise Windstep movement or interacting with a statue or pedestal. Good armour, a suitable weapon, and food are recommended even though the quest lists no required items.
Quest reward and the next crafting step
Highlighting the Problem rewards the Staff of Light recipe. Unlocking that recipe completes the quest objective; crafting the staff is a separate action performed at a Smithing Anvil.
The supplied recipe lists these materials:
| Material | Amount |
|---|---|
| Blightwood | 16 |
| Wild Anima | 8 |
| Sapphire | 4 |
| Vault Shard | 12 |
| Vault Core | 1 |
You can therefore finish the quest without carrying those resources through the vault or tower sequence. Gather them afterward and use a Smithing Anvil when you are ready to turn the unlocked recipe into the weapon.